iOS TableView實現QQ好友列表(二)
編輯:關於IOS
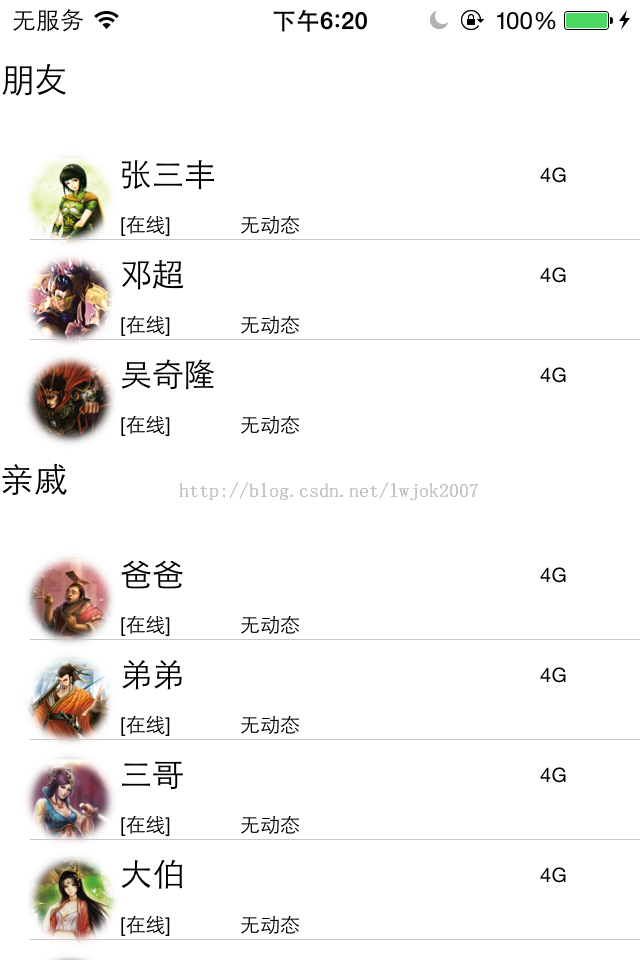
上一節實現了簡單的好友列表,但是信息不夠豐富,本節將好友的頭像,名稱,簽名等信息全部顯示出來

此處我們需要自定義cell
創建一個類 繼承
UITableViewCell
添加所需屬性
- #import <UIKit/UIKit.h>
- @interface UserTableViewCell : UITableViewCell
- @property (strong,nonatomic) UIImageView *headerphoto;//頭像
- @property (strong,nonatomic) UILabel *nameLabel;//昵稱
- @property (strong,nonatomic) UILabel *isOnLine;//是否在線
- @property (strong,nonatomic) UILabel *introductionLabel;//個性簽名,動態等
- @property (strong,nonatomic) UILabel *networkLabel;//網絡狀態
- @end
重寫初始化方法 添加各屬性
- -(instancetype)initWithStyle:(UITableViewCellStyle)style reuseIdentifier
 NSString *)reuseIdentifier
 - {
- self=[super initWithStyle:style reuseIdentifier:reuseIdentifier];
- if (self) {
- headerphoto=[[UIImageView alloc]initWithFrame:CGRectMake(10, 5, 50, 50)];
- [self.contentView addSubview:headerphoto];
- nameLabel=[[UILabel alloc]initWithFrame:CGRectMake(60, 5, 200, 25)];
- nameLabel.backgroundColor=[UIColor clearColor];
- nameLabel.font=[UIFont systemFontOfSize:16];
- [self.contentView addSubview:nameLabel];
- isOnLine=[[UILabel alloc]initWithFrame:CGRectMake(60, 40, 50, 5)];
- isOnLine.font=[UIFont systemFontOfSize:10];
- [self.contentView addSubview:isOnLine];
- introductionLabel=[[UILabel alloc]initWithFrame:CGRectMake(120, 40, 180, 5)];
- introductionLabel.font=[UIFont systemFontOfSize:10];
- [self.contentView addSubview:introductionLabel];
- networkLabel=[[UILabel alloc]initWithFrame:CGRectMake(SCREEN_WIDTH-50, 5, 50, 25)];
- networkLabel.font=[UIFont systemFontOfSize:10];
- [self.contentView addSubview:networkLabel];
- }
- return self;
- }
修改viewcontroller 中tablevew的delegate方法
- -(UITableViewCell *)tableView:(UITableView *)tableView cellForRowAtIndexPath
 NSIndexPath *)indexPath
 - {
- NSString *str=[titleArray objectAtIndex:indexPath.section];
- NSArray *arr=[dataDic objectForKey:str];
- static NSString *CellIdentifier = @"UserCell";
- UserTableViewCell *cell = [tableView dequeueReusableCellWithIdentifier:CellIdentifier];
- cell=nil;
- if (cell == nil) {
- cell = [[UserTableViewCell alloc]initWithStyle:UITableViewCellStyleDefault reuseIdentifier:CellIdentifier];
- cell.selectionStyle = UITableViewCellSelectionStyleGray;
- }
- NSDictionary *dic=[arr objectAtIndex:indexPath.row];
- cell.headerphoto.image=[UIImage imageNamed:[dic valueForKey:@"usericon"]];
- cell.nameLabel.text=[dic valueForKey:@"name"];
- cell.isOnLine.text=@"[在線]";
- cell.introductionLabel.text=@"無動態";
- cell.networkLabel.text=@"4G";
- return cell;
- }
將其中cell修改成自定義的cell 這樣就能按照自己想要的樣式去實現
此時完成了好友信息的基本展示
下節我們講繼續講一下如何講分組折疊起來
相關文章
+


