iOS中使用blend改變圖片顏色
最近對Core Animation和Core Graphics的內容東西比較感興趣,自己之前也在這塊相對薄弱,趁此機會也想補習一下這塊的內容,所以之後幾篇可能都會是對CA和CG學習的記錄的文章。
在應用裡一個很常見的需求是主題變換:同樣的圖標,同樣的素材,但是需要按照用戶喜愛變為不同的顏色。在iOS5和6的SDK裡部分標准控件引入了tintColor,來滿足個性化界面的需求,但是Apple在這方面還遠遠做的不夠。一是現在用默認控件根本難以做出界面優秀的應用,二是tintColor所 覆蓋的並不夠全面,在很多情況下開發者都無法使用其來完成個性化定義。解決辦法是什麼?最簡單當然是拜托設計師大大出圖,想要藍色主題?那好,開PS蓋個 藍色圖層出一套藍色的UI;又想加粉色UI,那好,再出一套粉色的圖然後導入Xcode。代碼上的話根據顏色需求使用image-blue或者 image-pink這樣的名字來加載圖片。
如果有一丁點重構的意識,就會知道這不是一個很好的解決方案。工程中存在大量的冗余和重復(就算你要狡辯這些圖片顏色不同不算重復,你也會在內心裡 知道這種狡辯是多麼無力),這是非常致命的。想象一下如果你有10套主題界面,先不論應用的體積會膨脹到多少,光是想做一點修改就會痛苦萬分,比如希望改 一下某個按鈕的形狀,很好,設計師大大請重復地修改10遍,並出10套UI,然後一系列的重命名,文件移動和導入…一場災難。
當然有其他辦法,因為說白了就是tint不同的顏色到圖片上而已,如果我們能實現改變UIImage的顏色,那我們就只需要一套UI,然後用代碼來 改變UI的顏色就可以了,生活有木有一下光明起來呀。嗯,讓我們先從一張圖片開始吧~下面是一張帶有alpha通道的圖片,原始顏色是純的灰色(當然什麼 顏色都可以,只不過我這個人現在暫時比較喜歡灰色而已)。
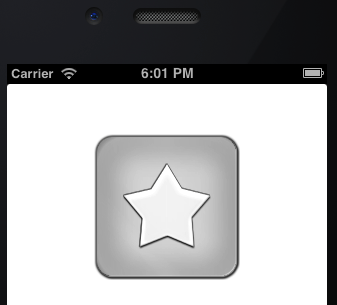
我們將用blending給這張圖片加上另一個純色作為tint,並保持原來的alpha通道。用Core Graphics來做的話,大概的想法很直接:
- 創建一個上下文用以畫新的圖片
- 將新的tintColor設置為填充顏色
- 將原圖片畫在創建的上下文中,並用新的填充色著色(注意保持alpha通道)
- 從當前上下文中取得圖片並返回
最麻煩的部分可能就是保持alpha通道了。UIImage的文檔中提供了使用blend繪圖的方法drawInRect:blendMode:alpha:,rect和alpha都沒什麼問題,但是blendMode是個啥玩意兒啊…繼續看文檔,關於CGBlendMode的文檔,裡面有一大堆看不懂的枚舉值,比如這樣:
<code class="hljs coffeescript">kCGBlendModeDestinationOver
R = S*(<span class="hljs-number">1</span> - Da) + D
Available <span class="hljs-keyword">in</span> iOS <span class="hljs-number">2.0</span> <span class="hljs-keyword">and</span> later.
Declared <span class="hljs-keyword">in</span> CGContext.h.
</code>
完全不懂..直接看之後的Discussion部分:
The blend mode constants introduced in OS X v10.5 represent the Porter-Duff blend modes. The symbols in the equations for these blend modes are:
R is the premultiplied result
S is the source color, and includes alpha
D is the destination color, and includes alpha
Ra, Sa, and Da are the alpha components of R, S, and D
原來如此,R表示結果,S表示包含alpha的原色,D表示包含alpha的目標色,Ra,Sa和Da分別是三個的alpha。明白了這些以後,就可以開始尋找我們所需要的blend模式了。相信你可以和我一樣,很快找到這個模式:
<code class="hljs coffeescript">kCGBlendModeDestinationIn
R = D*Sa
Available <span class="hljs-keyword">in</span> iOS <span class="hljs-number">2.0</span> <span class="hljs-keyword">and</span> later.
Declared <span class="hljs-keyword">in</span> CGContext.h.
</code>
結果 = 目標色和原色透明度的加成,看起來正式所需要的。啦啦啦,還等什麼呢,開始動手實現看看對不對吧~
為了以後使用方便,當然是祭出Category,先創建一個UIImage的類別:
<code class="objc hljs objectivec"><span class="hljs-comment">// UIImage+Tint.h</span> <span class="hljs-preprocessor">#import <span class="hljs-title"><UIKit/UIKit.h></span></span> <span class="hljs-class"><span class="hljs-keyword">@interface</span> <span class="hljs-title">UIImage</span> (<span class="hljs-title">Tint</span>)</span> - (<span class="hljs-built_in">UIImage</span> *) imageWithTintColor:(<span class="hljs-built_in">UIColor</span> *)tintColor; <span class="hljs-keyword">@end</span> </code>
暫時先這樣,當然我們也可以創建一個類方法直接完成從bundle讀取圖片然後加tintColor,但是很多時候並不如上面一個實例方法方便(比如想要從非bundle的地方獲取圖片),這個問題之後再說。那麼就按照之前設想的步驟來實現吧:
<code class="objc hljs objectivec"><span class="hljs-comment">//  UIImage+Tint.m</span>

<span class="hljs-preprocessor">#import <span class="hljs-title">"UIImage+Tint.h"</span></span>

<span class="hljs-class"><span class="hljs-keyword">@implementation</span> <span class="hljs-title">UIImage</span> (<span class="hljs-title">Tint</span>)</span>
- (<span class="hljs-built_in">UIImage</span> *) imageWithTintColor:(<span class="hljs-built_in">UIColor</span> *)tintColor
{
    <span class="hljs-comment">//We want to keep alpha, set opaque to NO; Use 0.0f for scale to use the scale factor of the device’s main screen.</span>
    UIGraphicsBeginImageContextWithOptions(<span class="hljs-keyword">self</span><span class="hljs-variable">.size</span>, <span class="hljs-literal">NO</span>, <span class="hljs-number">0.0</span>f);
    [tintColor setFill];
    <span class="hljs-built_in">CGRect</span> bounds = CGRectMake(<span class="hljs-number">0</span>, <span class="hljs-number">0</span>, <span class="hljs-keyword">self</span><span class="hljs-variable">.size</span><span class="hljs-variable">.width</span>, <span class="hljs-keyword">self</span><span class="hljs-variable">.size</span><span class="hljs-variable">.height</span>);
    UIRectFill(bounds);

    <span class="hljs-comment">//Draw the tinted image in context</span>
    [<span class="hljs-keyword">self</span> drawInRect:bounds blendMode:kCGBlendModeDestinationIn alpha:<span class="hljs-number">1.0</span>f];

    <span class="hljs-built_in">UIImage</span> *tintedImage = UIGraphicsGetImageFromCurrentImageContext();
    UIGraphicsEndImageContext();

    <span class="hljs-keyword">return</span> tintedImage;
}
<span class="hljs-keyword">@end</span>
</code>
簡單明了,沒有任何難點。測試之:[[UIImage imageNamed:@"image"] imageWithTintColor:[UIColor orangeColor]];,得到的結果為:

嗯...怎麼說呢,雖然tintColor的顏色是變了,但是總覺得怪怪的。仔細對比一下就會發現,原來灰色圖裡星星和周圍的灰度漸變到了橙色的圖 裡好像都消失了:星星整個變成了橙色,周圍的一圈漂亮的光暈也沒有了,這是神馬情況啊…這種圖能交差的話那算見鬼了,會被設計和產品打死的吧。對於無漸變 的純色圖的圖來說直接用上面的方法是沒問題的,但是現在除了Metro的大色塊以外哪裡無灰度漸變的設計啊…檢查一下使用的blend,R = D * Sa,恍然大悟,我們雖然保留了原色的透明度,但是卻把它的所有的灰度信息弄丟了。怎麼辦?繼續刨CGBlendMode的文檔吧,那麼多blend模式應該總有我們需要的。功夫不負有心人,kCGBlendModeOverlay一副嗷嗷待選的樣子:
<code class="hljs coffeescript">kCGBlendModeOverlay
Either multiplies <span class="hljs-keyword">or</span> screens the source image samples <span class="hljs-reserved">with</span> the background image samples, depending <span class="hljs-literal">on</span> the background color. The result <span class="hljs-keyword">is</span> to overlay the existing image samples <span class="hljs-keyword">while</span> preserving the highlights <span class="hljs-keyword">and</span> shadows <span class="hljs-keyword">of</span> the background. The background color mixes <span class="hljs-reserved">with</span> the source image to reflect the lightness <span class="hljs-keyword">or</span> darkness <span class="hljs-keyword">of</span> the background.
Available <span class="hljs-keyword">in</span> iOS <span class="hljs-number">2.0</span> <span class="hljs-keyword">and</span> later.
Declared <span class="hljs-keyword">in</span> CGContext.h.
</code>
kCGBlendModeOverlay可以保持背景色的明暗,也就是灰度信息,聽起來正是我們需要的。加入到聲明中,並且添加相應的實現( 順便重構一下原來的代碼  ):
):
<code class="objc hljs objectivec"><span class="hljs-comment">// UIImage+Tint.h</span> <span class="hljs-preprocessor">#import <span class="hljs-title"><UIKit/UIKit.h></span></span> <span class="hljs-class"><span class="hljs-keyword">@interface</span> <span class="hljs-title">UIImage</span> (<span class="hljs-title">Tint</span>)</span> - (<span class="hljs-built_in">UIImage</span> *) imageWithTintColor:(<span class="hljs-built_in">UIColor</span> *)tintColor; - (<span class="hljs-built_in">UIImage</span> *) imageWithGradientTintColor:(<span class="hljs-built_in">UIColor</span> *)tintColor; <span class="hljs-keyword">@end</span> </code>
<code class="objc hljs objectivec"><span class="hljs-comment">//  UIImage+Tint.m</span>

<span class="hljs-preprocessor">#import <span class="hljs-title">"UIImage+Tint.h"</span></span>

<span class="hljs-class"><span class="hljs-keyword">@implementation</span> <span class="hljs-title">UIImage</span> (<span class="hljs-title">Tint</span>)</span>
- (<span class="hljs-built_in">UIImage</span> *) imageWithTintColor:(<span class="hljs-built_in">UIColor</span> *)tintColor
{
    <span class="hljs-keyword">return</span> [<span class="hljs-keyword">self</span> imageWithTintColor:tintColor blendMode:kCGBlendModeDestinationIn];
}

- (<span class="hljs-built_in">UIImage</span> *) imageWithGradientTintColor:(<span class="hljs-built_in">UIColor</span> *)tintColor
{
    <span class="hljs-keyword">return</span> [<span class="hljs-keyword">self</span> imageWithTintColor:tintColor blendMode:kCGBlendModeOverlay];
}

- (<span class="hljs-built_in">UIImage</span> *) imageWithTintColor:(<span class="hljs-built_in">UIColor</span> *)tintColor blendMode:(CGBlendMode)blendMode
{
    <span class="hljs-comment">//We want to keep alpha, set opaque to NO; Use 0.0f for scale to use the scale factor of the device’s main screen.</span>
    UIGraphicsBeginImageContextWithOptions(<span class="hljs-keyword">self</span><span class="hljs-variable">.size</span>, <span class="hljs-literal">NO</span>, <span class="hljs-number">0.0</span>f);
    [tintColor setFill];
    <span class="hljs-built_in">CGRect</span> bounds = CGRectMake(<span class="hljs-number">0</span>, <span class="hljs-number">0</span>, <span class="hljs-keyword">self</span><span class="hljs-variable">.size</span><span class="hljs-variable">.width</span>, <span class="hljs-keyword">self</span><span class="hljs-variable">.size</span><span class="hljs-variable">.height</span>);
    UIRectFill(bounds);

    <span class="hljs-comment">//Draw the tinted image in context</span>
    [<span class="hljs-keyword">self</span> drawInRect:bounds blendMode:blendMode alpha:<span class="hljs-number">1.0</span>f];

    <span class="hljs-built_in">UIImage</span> *tintedImage = UIGraphicsGetImageFromCurrentImageContext();
    UIGraphicsEndImageContext();

    <span class="hljs-keyword">return</span> tintedImage;
}

<span class="hljs-keyword">@end</span>
</code>
完成,測試之…好吧,好尴尬,雖然顏色和周圍的光這次對了,但是透明度又沒了啊魂淡..一點不奇怪啊,因為kCGBlendModeOverlay本來就沒承諾給你保留原圖的透明度的說。

那麼..既然我們用kCGBlendModeOverlay能保留灰度信息,用kCGBlendModeDestinationIn能保留透明度信息,那就兩個blendMode都用不就完事兒了麼~嘗試之,如果在blend繪圖時不是kCGBlendModeDestinationIn模式的話,則再用kCGBlendModeDestinationIn畫一次:
<code class="objc hljs objectivec"><span class="hljs-comment">//  UIImage+Tint.m</span>

<span class="hljs-preprocessor">#import <span class="hljs-title">"UIImage+Tint.h"</span></span>

<span class="hljs-class"><span class="hljs-keyword">@implementation</span> <span class="hljs-title">UIImage</span> (<span class="hljs-title">Tint</span>)</span>
- (<span class="hljs-built_in">UIImage</span> *) imageWithTintColor:(<span class="hljs-built_in">UIColor</span> *)tintColor
{
    <span class="hljs-keyword">return</span> [<span class="hljs-keyword">self</span> imageWithTintColor:tintColor blendMode:kCGBlendModeDestinationIn];
}

- (<span class="hljs-built_in">UIImage</span> *) imageWithGradientTintColor:(<span class="hljs-built_in">UIColor</span> *)tintColor
{
    <span class="hljs-keyword">return</span> [<span class="hljs-keyword">self</span> imageWithTintColor:tintColor blendMode:kCGBlendModeOverlay];
}

- (<span class="hljs-built_in">UIImage</span> *) imageWithTintColor:(<span class="hljs-built_in">UIColor</span> *)tintColor blendMode:(CGBlendMode)blendMode
{
    <span class="hljs-comment">//We want to keep alpha, set opaque to NO; Use 0.0f for scale to use the scale factor of the device’s main screen.</span>
    UIGraphicsBeginImageContextWithOptions(<span class="hljs-keyword">self</span><span class="hljs-variable">.size</span>, <span class="hljs-literal">NO</span>, <span class="hljs-number">0.0</span>f);
    [tintColor setFill];
    <span class="hljs-built_in">CGRect</span> bounds = CGRectMake(<span class="hljs-number">0</span>, <span class="hljs-number">0</span>, <span class="hljs-keyword">self</span><span class="hljs-variable">.size</span><span class="hljs-variable">.width</span>, <span class="hljs-keyword">self</span><span class="hljs-variable">.size</span><span class="hljs-variable">.height</span>);
    UIRectFill(bounds);

    <span class="hljs-comment">//Draw the tinted image in context</span>
    [<span class="hljs-keyword">self</span> drawInRect:bounds blendMode:blendMode alpha:<span class="hljs-number">1.0</span>f];

    <span class="hljs-keyword">if</span> (blendMode != kCGBlendModeDestinationIn) {
        [<span class="hljs-keyword">self</span> drawInRect:bounds blendMode:kCGBlendModeDestinationIn alpha:<span class="hljs-number">1.0</span>f];
    }

    <span class="hljs-built_in">UIImage</span> *tintedImage = UIGraphicsGetImageFromCurrentImageContext();
    UIGraphicsEndImageContext();

    <span class="hljs-keyword">return</span> tintedImage;
}

<span class="hljs-keyword">@end</span>
</code>
結果如下:

已經很完美了,這樣的話只要在代碼裡設定一下顏色,我們就能夠很輕易地使用同樣一套UI,將其blend為需要的顏色,來實現素材的重用了。唯一需要注意的是,因為每次使用UIImage+Tint的 方法繪圖時,都使用了CG的繪制方法,這就意味著每次調用都會是用到CPU的Offscreen drawing,大量使用的話可能導致性能的問題(主要對於iPhone 3GS或之前的設備,可能同時處理大量這樣的繪制調用的能力會有不足)。關於CA和CG的性能的問題,打算在之後用一篇文章來介紹一下。對於這裡的UIImage+Tint的實現,可以寫一套緩存的機制,來確保大量重復的元素只在load的時候blend一次,之後將其緩存在內存中以快速讀取。當然這是一個權衡的問題,在時間和空間中做出正確的平衡和選擇,也正是程序設計的樂趣所在。
這篇文章中作為示例的工程和UIImage+Tint可以在Github上找到,您可以隨意玩弄..我相信也會是個來研究每種blend的特性的好機會~


